







Migrate from Amazon FSx for NetApp ONTAP Generation 1 to Generation 2 File System
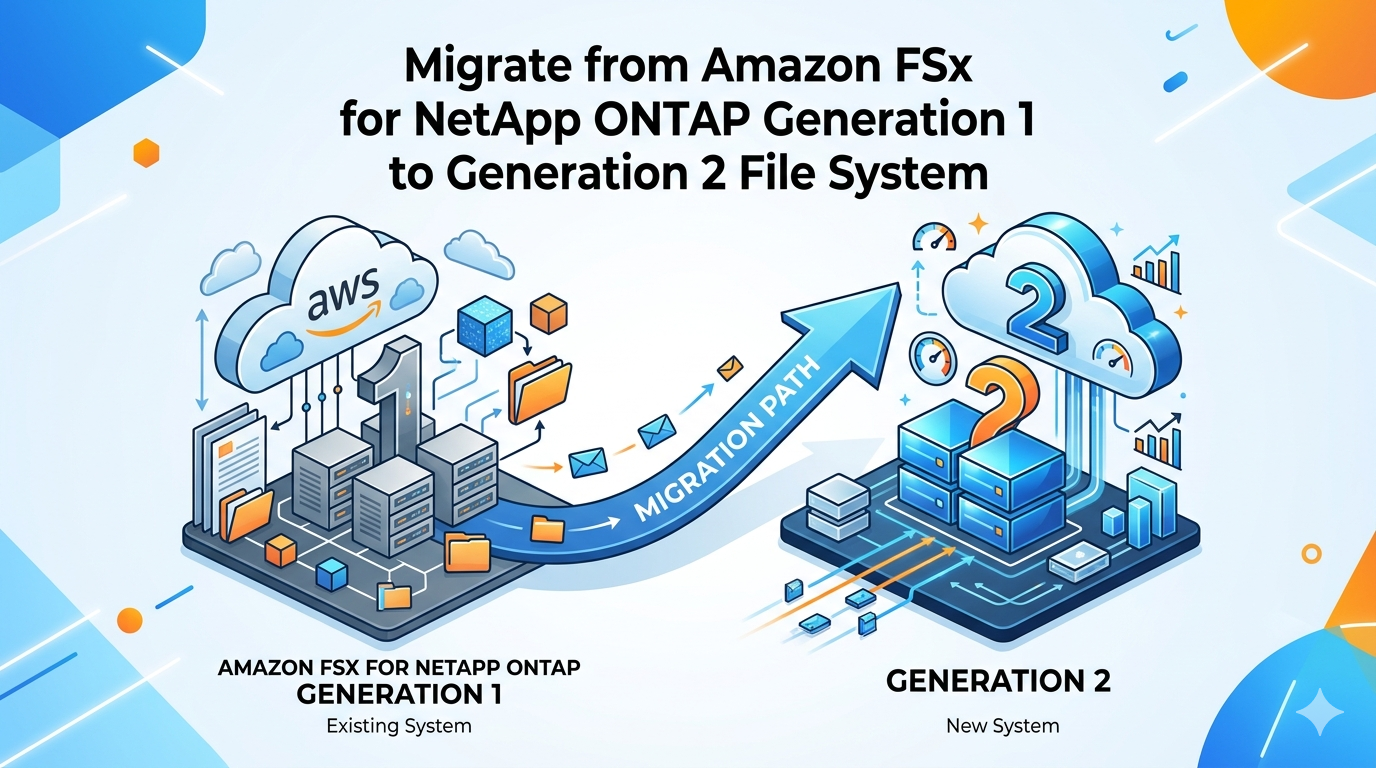
Amazon FSx for NetApp ONTAP (FSxN) is a fully-managed AWS service that brings NetApp’s ONTAP file system to AWS. It seamlessly supports multi-protocol access (NFS, SMB, iSCSI, and NVMe-over-TCP) alongside familiar, robust features like zero-capacity snapshots, rapid cloning, & SnapMirror replication. The first generation (gen 1) of FSxN established a bridge between on-prem storage & AWS, but migrating to generation 2 is a big architectural leap. Designed for compute-intensive, data-hungry applications, gen 2 shifts from a single high-availability (HA) pair limit to a highly flexible, scale-out architecture capable of supporting up to 12 HA pairs. This transition unlocks big benefits: up to 18 times higher performance scalability, 72 GBps of throughput & 1 PiB of provisioned SSD storage.
A gen 1 file system cannot be converted to gen 2 in-place. You must create a new gen 2 file system & migrate data from gen 1 to gen 2. This article describes how we executed this migration step by step. Essentially, the approach is to discover existing gen 1 infra, create similar FSx volumes in gen 2, replicate data from gen 1 volumes to gen 2 volumes using SnapMirror & cutover the workloads using gen 1, to gen 2. All our workloads are in Amazon EKS, where NetApp Trident CSI driver connects to FSx. To learn more about Trident, see Migrate Amazon EKS Apps from NFS CSI to NetApp Trident CSI Driver. All Terraform code discussed here, is hosted on GitHub.
Create Gen 2 Infra
Start by scaling up the existing gen 1 throughput & IOPS at https://console.aws.amazon.com/fsx/home to accommodate the upcoming SnapMirror replication. Unrestricted SnapMirror replicates data at 2.5 GiB/s. With several FSx volumes replicating terabytes in parallel, this can easily saturate the file system’s resources. Ours was a live migration so gen 1 was in production use the entire time. SnapMirror should not affect normal EKS apps reading/writing to gen 1.
Create gen 2 file system & storage virtual machine (SVM) using the terraform-aws-modules/fsx/aws//modules/ontap Terraform module. Discover gen 1 volumes & create duplicate volumes in gen 2, pre-configured as target for SnapMirror replication:
module "fsx_ontap" {
  version = "<2"
  source  = "terraform-aws-modules/fsx/aws//modules/ontap"

  name     = var.common_name
  ha_pairs = 1

  deployment_type    = "SINGLE_AZ_2"
  storage_capacity   = var.storage_capacity
  fsx_admin_password = local.svm_admin_password

  disk_iops_configuration         = var.iops != null ? { iops = var.iops, mode = "USER_PROVISIONED" } : {}
  throughput_capacity_per_ha_pair = var.throughput_capacity

  subnet_ids          = data.aws_subnets.fsx.ids
  preferred_subnet_id = data.aws_subnets.fsx.ids[0]

  create_security_group = false
  security_group_ids    = [data.aws_security_group.fsx.id]

  storage_virtual_machines = {
    svm = {
      name = var.common_name

      svm_admin_password         = local.svm_admin_password
      root_volume_security_style = "UNIX" # For Trident CSI driver compatibility

      # https://github.com/terraform-aws-modules/terraform-aws-fsx/blob/master/modules/ontap/main.tf#L111
      volumes = {
        for volume in data.netapp-ontap_volumes.fsx_gen1.storage_volumes :
        volume.name => {
          name = volume.name

          # This volume will be the target of a SnapMirror relationship
          ontap_volume_type = "DP"

          tiering_policy = { name = "ALL" }
          # Will be changed to "auto" after migrating data to this volume from gen1

          skip_final_backup = true
          size_in_megabytes = volume.space.size * local.size_unit_to_mb[lower(volume.space.size_unit)]

          copy_tags_to_backups = true
          tags = {
            Name = volume.name
            # https://registry.terraform.io/providers/NetApp/netapp-ontap/latest/docs/data-sources/volumes#nested-schema-for-storage_volumes

            "Replicated from FSx Gen1 File System" = volume.cx_profile_name
            "Replicated from FSx Gen1 SVM"         = volume.svm_name
            "Replicated from FSx Gen1 Volume"      = volume.name

            "FSx Gen1 Cooling Days"   = volume.tiering.minimum_cooling_days
            "FSx Gen1 Junction Path"  = volume.nas.junction_path
            "FSx Gen1 Tiering Policy" = volume.tiering.policy_name
            "FSx Gen1 Volume Size"    = "${volume.space.size} ${volume.space.size_unit}"
          }
        }
      }
    }
  }
}
Connect Trident to Gen 2
Create Trident backend config & storage class in EKS so EKS apps can start using gen 2:
resource "kubectl_manifest" "trident_backend_config" {
  depends_on = [module.svm_credentials]

  yaml_body = yamlencode({
    kind       = "TridentBackendConfig"
    apiVersion = "trident.netapp.io/v1"

    metadata = {
      name      = "fsx"
      namespace = "trident"
    }

    spec = {
      aws = { fsxFilesystemID = module.fsx_ontap.file_system_id }
      svm = module.fsx_ontap.storage_virtual_machines["svm"].name

      version           = 1
      backendName       = "fsx"
      storageDriverName = "ontap-nas"

      credentials = {
        type = "awsarn"
        name = module.svm_credentials.secret_arn
      }

      # https://docs.netapp.com/us-en/trident/trident-use/trident-fsx-storage-backend.html#backend-configuration-options-for-provisioning-volumes
      defaults = {
        tieringPolicy = "all" # Switch to 'auto' after data migration from gen1

        # Auto-created FSx volumes will be named:
        # <PVC name with underscores>_<first 5 chars of UUID of dynamic PV name>
        nameTemplate = "{{ .volume.RequestName }}"
      }
    }
  })
}
resource "kubernetes_storage_class_v1" "fsx" {
metadata {
name = kubectl_manifest.trident_backend_config.name
}
depends_on = [module.fsx_ontap]
reclaim_policy = "Retain"
volume_binding_mode = "Immediate"
storage_provisioner = "csi.trident.netapp.io"
allow_volume_expansion = true
parameters = {
"fsType" : "nfs"
"backendType" : "ontap-nas"
"storagePools" : "${kubectl_manifest.trident_backend_config.name}:.*"
}
}Replicate Data from Gen 1 to Gen 2
To create SnapMirror relationships between gen 1 & gen 2 volumes, first peer ONTAP file systems, then peer SVMs, then create SnapMirror relationships:
resource "netapp-ontap_cluster_peer" "gen1_gen2" {
  cx_profile_name      = "fsx-gen2"
  peer_cx_profile_name = "fsx-gen1"

  peer_applications   = ["snapmirror"]
  generate_passphrase = "true"

  source_details = {
    ip_addresses = tolist(module.fsx_ontap.file_system_endpoints[0].intercluster[0].ip_addresses)
  }
  remote = {
    ip_addresses = tolist(data.aws_fsx_ontap_file_system.fsx_gen1.endpoints[0].intercluster[0].ip_addresses)
  }
}
resource "netapp-ontap_svm_peer" "gen1_gen2" {
depends_on = [netapp-ontap_cluster_peer.gen1_gen2]
cx_profile_name = "fsx-gen1"
applications = ["snapmirror"]
svm = { name = "fsx-gen1" }
peer = {
peer_cx_profile_name = "fsx-gen2"
cluster = {
name = "FsxId${substr(module.fsx_ontap.file_system_id, 3, -1)}"
}
svm = {
name = module.fsx_ontap.storage_virtual_machines.svm.name
}
}
}resource "netapp-ontap_snapmirror" "gen1_gen2" {
for_each = { for volume in
data.netapp-ontap_volumes.fsx_gen1.storage_volumes : volume.name => volume }
cx_profile_name = "fsx-gen2"
policy = { name = "Asynchronous" }
source_endpoint = { path = "fsx-gen1:${each.key}" }
destination_endpoint = {
path = "${module.fsx_ontap.storage_virtual_machines.svm.name}:${each.key}"
}
}As soon as SnapMirror relationships are created, they’re also initialized & data replication begins at its max rate of 2.5 GiB/s.
Monitor SnapMirror: ONTAP CLI
Unless you already have an EC2 with FSx access, it’s convenient to have a ready-to-use ONTAP CLI directly in EKS. We use an Alpine container, pre-configured with FSx endpoint & credentials. As soon as a storage admin opens a shell in this pod, they land in ONTAP CLI:
resource "kubectl_manifest" "ontap_cli_deployment" {
  depends_on = [kubectl_manifest.ontap_cli_pvc]

  yaml_body = yamlencode({
    apiVersion = "apps/v1"
    kind       = "Deployment"

    metadata = {
      name      = local.ontap_cli_name
      namespace = local.ontap_cli_namespace
      labels    = { app = local.ontap_cli_name }
    }

    spec = {
      replicas = 0 # Scale up manually in EKS when needed
      selector = { matchLabels = { app = local.ontap_cli_name } }

      template = {
        metadata = { labels = { app = local.ontap_cli_name } }

        spec = {
          securityContext = { fsGroup = 1000 }

          containers = [{
            name  = local.ontap_cli_name
            image = "alpine"

            # Install SSH tools, create SVM connect script, leave container running
            command = ["/bin/sh", "-c"]
            args = [<<-EOF
              apk add --no-cache openssh-client sshpass

              cat > /ssh-to-svm.sh << 'SCRIPT'
                ssh_to_svm() {
                  sshpass -e ssh -o StrictHostKeyChecking=accept-new \
                    -o UserKnownHostsFile=/dev/null -o LogLevel=ERROR \
                    "$FSX_SVM_USER@$FSX_SVM_HOST" "$@"
                }

                echo Connecting to SVM...
                echo ONTAP CLI help:
                ssh_to_svm '?'
                ssh_to_svm # Open interactive session
              SCRIPT

              sleep infinity
            EOF
            ]

            env = [
              {
                # ENV makes sh source this script for non-login shells
                # so as soon as a shell is opened in this pod, it auto-connects to SVM
                name  = "ENV"
                value = "/ssh-to-svm.sh"
              },

              # Environment variables for SSH connection
              {
                name  = "FSX_SVM_HOST"
                value = local.svm_management_host
              },
              {
                name  = "FSX_SVM_USER"
                value = local.svm_username
              },
              {
                name  = "SSHPASS" # Must be named SSHPASS for sshpass
                value = local.svm_admin_password
              }
            ]

            # Security context - run as root to allow apk install
            securityContext = {
              runAsNonRoot = false
              capabilities = { drop = ["ALL"] }

              allowPrivilegeEscalation = false
              readOnlyRootFilesystem   = false # Need to install packages
            }
          }]
        }
      }
    }
  })
}
Use ONTAP CLI commands like snapmirror show to monitor data replication.
Monitor SnapMirror: NetApp Console
NetApp console at console.netapp.com can also monitor data replication If you connect your gen 2 file system to NetApp console.
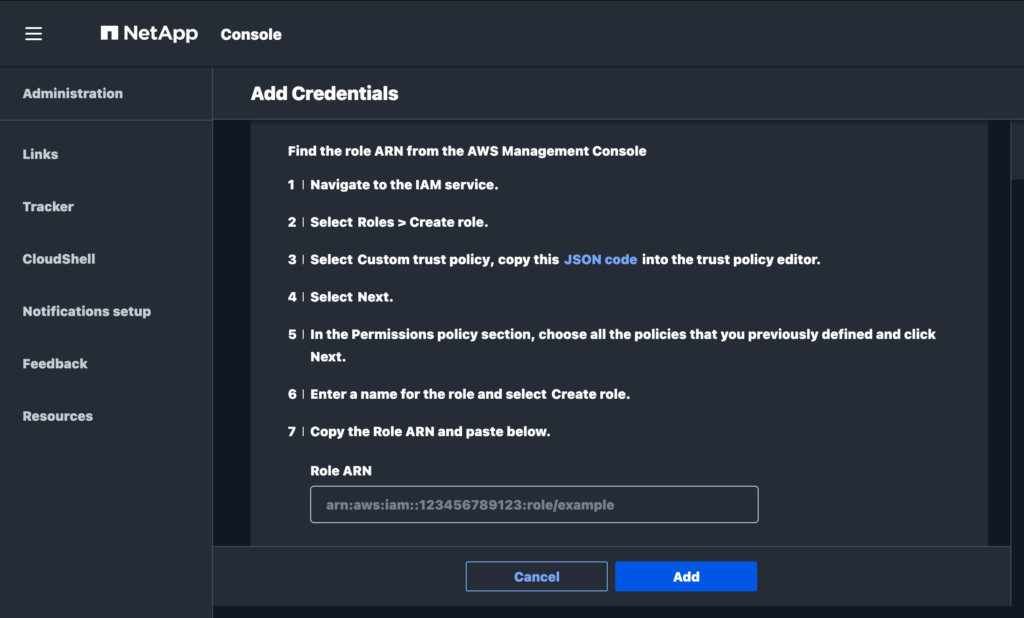
First, NetApp console needs an AWS IAM role that it can assume to discover your FSx:
module "netapp_console_role" {
  version = "<7"
  name    = "netapp-console"
  source  = "terraform-aws-modules/iam/aws//modules/iam-role"

  use_name_prefix      = false
  create_inline_policy = true

  inline_policy_permissions = {
    FSx = {
      resources = ["*"]
      actions   = ["fsx:*", "ce:Get*", "ec2:Describe*", "cloudwatch:Get*", "iam:SimulatePrincipalPolicy"]
    }
  }

  trust_policy_permissions = {
    NetAppConsole = {
      actions = ["sts:AssumeRole"]

      principals = [{
        type        = "AWS"
        identifiers = ["arn:aws:iam::${local.netapp_console_aws_account_id}:root"]
      }]

      condition = [{
        test     = "StringEquals"
        variable = "sts:ExternalId"
        values   = [local.netapp_console_account_id]
      }]
    }
  }
}
Use this role ARN to create a credential in NetApp console at https://console.netapp.com/fsxadministration/credentials/create
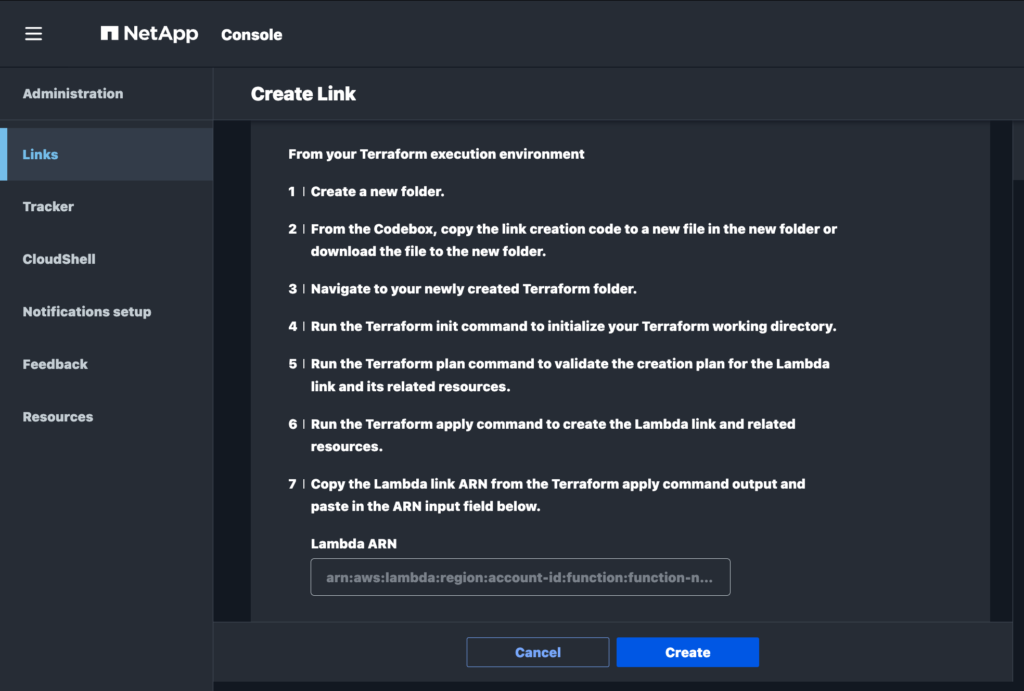
Since FSx is in a private VPC, NetApp console also needs a Lambda function with network access to FSx, to call ONTAP REST APIs as needed:
module "netapp_console_link" {
  timeout = 10
  version = "<9"
  publish = true
  source  = "terraform-aws-modules/lambda/aws"

  role_name     = "netapp-console-link"
  function_name = "netapp-console-link"
  description   = "https://console.netapp.com/fsxadministration/links"

  create_package = false
  package_type   = "Image"
  image_uri      = "${local.netapp_console_aws_account_id}.dkr.ecr.${data.aws_region.current.id}.amazonaws.com/fsx_link:production"

  vpc_subnet_ids         = data.aws_subnets.fsx.ids
  vpc_security_group_ids = [data.aws_security_group.fsx.id]

  attach_policies       = true
  number_of_policies    = 2
  attach_network_policy = true

  policies = [
    "arn:aws:iam::aws:policy/service-role/AWSLambdaRole",
    "arn:aws:iam::aws:policy/service-role/AWSLambdaBasicExecutionRole"
  ]

  allowed_triggers = {
    invoke_permission = {
      principal = "arn:aws:iam::${local.netapp_console_aws_account_id}:user/proxy-forwarder"
    }
  }
}
Use this Lambda function ARN to create a “link” in NetApp console at https://console.netapp.com/fsxadministration/links/create
Now we can monitor data replication at https://console.netapp.com/fsxstorage/fsx > select file system > replication relationships tab. Wait for all replications to complete.
Cutover EKS Apps from Gen 1 to Gen 2
Scale down all apps writing to gen 1, select all replications in NetApp console & update. This performs a final sync of data from gen 1 to gen 2. After all syncs complete, pause all replications then break all replication relationships. This will change the volume type of all gen 2 volumes from DP to RW & tiering policy from ALL to AUTO. They’re now ready for use by EKS apps. terraform destroy all SnapMirror relationships & associated resources like ONTAP cluster peerings & SVM peerings.
Since we were also migrating from NFS CSI driver to Trident alongside this gen 1 to gen 2 migration, we re-created all PVCs to switch to Trident storage class. See the final step of Migrate Amazon EKS Apps from NFS CSI to NetApp Trident CSI Driver. This concludes gen 1 to gen 2 migration. Scale up EKS apps to start using gen 2. Gen 1 infra can now be deleted.
 Linkedin