


How to Split TypeScript-Based Lambda Functions into Lambda Layers

Layers in Lambda are a way to share common code & dependencies across Lambda functions. Before layers were introduced you had to package everything in the Lambda function’s deployment package. This meant that all common code & dependencies were duplicated in every function, even if that’s not the case in your codebase.
Layers let you fix this! You could build a layer for all your dependencies & another for all shared code. You can then attach 1 or both of these layers to all Lambda functions that need their content.
The layer itself is just a ZIP file. At runtime, it is extracted in a subdirectory of /opt based on your function’s runtime. For Node.js, it’s /opt/nodejs.
If you’re familiar with Docker, you know that many Dockerfile commands create “layers” in Docker, also known as intermediate images. That’s where the name Lambda layer comes from & that’s exactly how Lambda uses them under the hood.
The Lambda runtime is a container. When a function is run, Lambda applies your layers onto the container in the order that you specified. That’s why files in an earlier layer are overwritten by files in a later layer if they have the same path & name, just as they would in a Docker image.
Note that layers can only be used in ZIP-based functions, not container-based functions. If you’re using containers for your functions, you might as well incorporate the layer’s contents into the image itself.
What About TypeScript Functions?
In this article, I’ll walk you through how to split up TypeScript functions into layers. TypeScript adds a bit of a challenge because it’s not deployed to Lambda as-is. It’s transpiled first into JavaScript & then deployed. Maintaining all the layer segregation & the import paths in code during this intermediate step takes a bit of work.
But first, let’s look at how everything was before layers came into the picture. Our code sits in a CodeCommit repo & has the following structure:
$ tree
.
|-- common
|   |-- constants.ts
|   |-- db.ts
|   |-- messages.ts
|   |-- services
|   |   |-- auth-service.ts
|   |   |-- email-service.ts
|   |   `-- logger-service.ts
|   `-- utils
|       |-- s3-util.ts
|       |-- date-util.ts
|       `-- env-util.ts
|-- functions
|   |-- create-employee
|   |   `-- handler.ts
|   |-- get-employee
|   |   `-- handler.ts
|   `-- delete-employee
|       `-- handler.ts
|-- buildspec.yaml
|-- node_modules
|-- package.json
|-- sam-template.yaml
`-- tsconfig.json- As you can see, the entire repo in 1 big NPM package; hence the
package.jsonin the root directory. - Running
npm installhere creates thenode_modulesdirectory with all NPM dependencies. tsconfig.jsondefines compiler options for the TypeScript compiler.commoncontains code used by all Lambda functions. The contents ofcommonare not relevant here.functionscontains 1 folder each for every Lambda function to be deployed. Each folder has a handler that simply calls into various services to get things done.buildspec.yamlcontains build commands (npm install&tsc) to be run by a CodeBuild project to transpile TypeScript into JavaScript.sam-template.yamlis an AWS SAM template that is transformed into a CloudFormation template by aaws cloudformation packagecommand inbuildspec.yaml. This template defines all Lambda function resources.
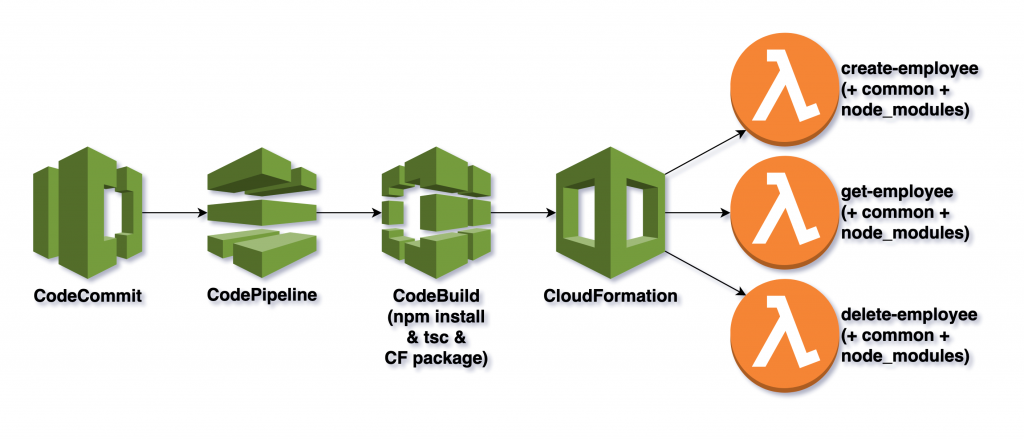
To sum it all up, this is how the entire code-to-deployment workflow looks like:
Our objective here is to turn this into the following:
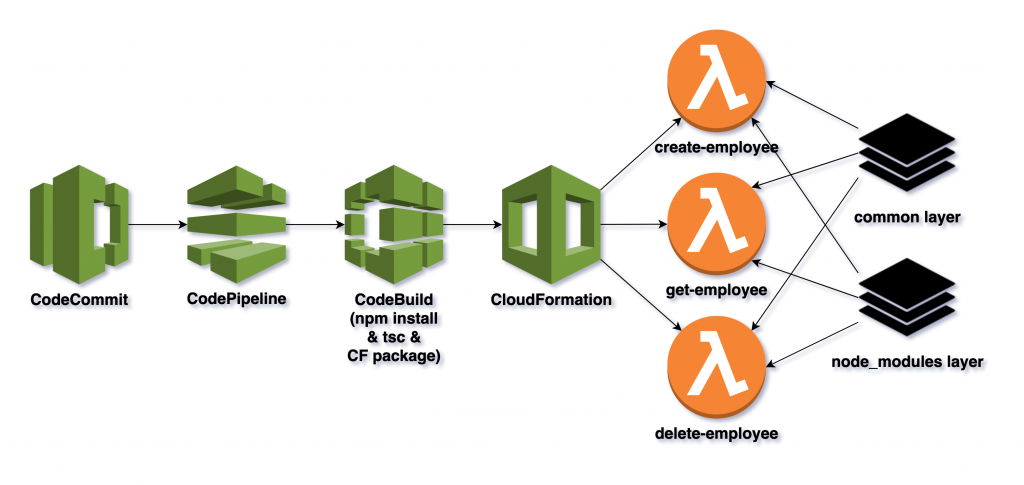
The contents of common will turn into a layer & node_modules will go into another layer. At runtime, these will show up on the filesystem as follows:
$ tree /opt
/opt
|-- constants.ts
|-- db.ts
|-- messages.ts
|-- services
|   |-- auth-service.ts
|   |-- email-service.ts
|   `-- logger-service.ts
|-- utils
|   |-- s3-util.ts
|   |-- date-util.ts
|   `-- env-util.ts
`-- node_modules
This will require changes at every stage: code, build & deployment. So let’s begin!
Code Changes
We begin by updating the code so it can find code & dependencies in /opt. Search the codebase looking for imports from common & change them to /opt/nodejs. Here’s an example:
functions/get-employee/handler.ts was importing a service from common:
import { AUTH_SERVICE } from "../../common/services/auth-service"Change this to:
import { AUTH_SERVICE } from "/opt/nodejs/services/auth-service"This will work well when the Lambda function is running in AWS, but what about locally? VS code won’t find anything in /opt/nodejs in your local dev env! To fix this, add these compiler options to tsconfig.json:
{
  "compilerOptions": {
    "baseUrl": ".",
    "paths": {
      "/opt/nodejs/*": [
        "common/*"
      ]
    }
  }
}
This will tell the TypeScript compiler to look for all imports starting with /opt/nodejs in common.
Before we move on to making build changes, we need to tackle another TypeScript-specific issue. You see, by default, when you run the TypeScript compiler on your code, it will simply create a JS next to every TS it finds. So you’ll end up with something like this:
$ tree
.
|-- common
|   |-- constants.js
|   |-- constants.ts
|   |-- db.js
|   |-- db.ts
|   |-- messages.js
|   |-- messages.ts
|   |-- services
|   |   |-- auth-service.js
|   |   |-- auth-service.ts
|   |   |-- email-service.js
|   |   |-- email-service.ts
|   |   |-- logger-service.js
|   |   `-- logger-service.ts
|   `-- utils
|       |-- s3-util.js
|       |-- s3-util.ts
|       |-- date-util.js
|       |-- date-util.ts
|       |-- env-util.js
|       `-- env-util.ts
|-- functions
|   |-- create-employee
|   |   |-- handler.js
|   |   `-- handler.ts
|   |-- get-employee
|   |   |-- handler.js
|   |   `-- handler.ts
|   `-- delete-employee
|       |-- handler.js
|       `-- handler.ts
|-- buildspec.yaml
|-- node_modules
|-- package.json
|-- sam-template.yaml
`-- tsconfig.json
Imagine writing a build script to collect all those JS files from everywhere just to put them in a layer. This can be simplified a lot by adding another TS compiler option:
{
  "compilerOptions": {
    "outDir": "./dist"
  }
}
This will create all JS files in a directory called dist. This makes it much easier to ZIP them up in a layer in the next step.
Build Changes
Next, we make changes to the build spec such that when the SAM template looks for code files in certain places to create the layers, it can find them.
The existing build spec looks like this:
version: 0.2
phases:
  install:
    runtime-versions:
      nodejs: 14
    commands:
      - npm i -g typescript
  build:
    commands:
      - npm install
      - tsc
  post_build:
    commands:
      - >
        aws cloudformation package
        --s3-bucket $S3_BUCKET
        --template-file sam-template.yaml
        --output-template-file cloudformation-template.yaml
artifacts:
  files:
    - cloudformation-template.yaml
  discard-paths: yes
Add the following to the build commands:
phases:
  build:
    commands:
      # node modules layer
      - mkdir -p node-modules-layer/nodejs
      - mv node_modules node-modules-layer/nodejs/
      # common layer
      - mkdir -p common-layer/nodejs
      - mv dist/common/* common-layer/nodejs/
These commands simply create certain directories & move some files into them.
The first set of commands create node-modules-layer/nodejs/node_modules. When we add the Lambda layer resource to the SAM template later, it will look inside node-modules-layer for the layer’s content. As a result, it will pick up nodejs/node_modules that will turn into /opt/nodejs/node_modules at runtime!
The second set of commands create common-layer/nodejs/* where * is the content of common, not common itself. When we add the Lambda layer resource to the SAM template later, it will look inside common-layer for the layer’s content. As a result, it will pick up nodejs/* that will turn into /opt/nodejs/* at runtime!
Deployment Changes
Next, let’s look at the changes required in the SAM template itself. The original SAM template is as follows:
AWSTemplateFormatVersion: 2010-09-09
Transform: AWS::Serverless-2016-10-31
Globals:
  Function:
    Runtime: nodejs14.x
Resources:
  GetEmployee:
    Type: AWS::Serverless::Function
    Properties:
      Handler: handler.handler
      FunctionName: get-employee
      CodeUri: dist/functions/get-employee/
First, add 2 resources for the layers:
Resources:
  NodeModulesLayer:
    Type: AWS::Serverless::LayerVersion
    Properties:
      LayerName: node-modules
      ContentUri: node-modules-layer/
      CompatibleRuntimes:
        - "nodejs14.x"
  CommonLayer:
    Type: AWS::Serverless::LayerVersion
    Properties:
      LayerName: common
      ContentUri: common-layer/
      CompatibleRuntimes:
        - "nodejs14.x"
Note how the ContentUri above points to the directories, we created during the build.
Now to attach the layers to the Lambda functions, you can either add the following to individual function resources or to the Globals section if you want the layers to attach to all functions:
Globals:
  Function:
    Runtime: nodejs14.x
    Layers:
      - !Ref NodeModulesLayer
      - !Ref CommonLayer
Conclusion
With that, we’re at the end of our transformation journey. Just re-run your CodePipeline & your Lambda functions will start using the new layers!
What’s great tutorial saving my sam!
Thanks.
Im getting Unzipped size must be smaller than 262144000 bytes. any advice? looks like node_modules is too big.
Lambda has a limit of 250 MB on the size of the deployment package. This is a hard limit, not a soft limit so you can’t request AWS support to increase it either.
A few tips:
devDependenciesin yourpackage.json& usenpm install —prod-onlyto create your Lambda ZIP.If none of this helps, you might have to consider moving to container-based Lambdas instead of ZIPs.
Where can I find the code for this? Is it public? I would love to see the repo.
Hey Max, welcome to our blog. Unfortunately, the source code for this article isn’t public since it was generalized from a much larger customer application. However, the article itself is written in a “step-by-step guide” fashion. You should be able to follow the steps on any TypeScript Lambda to achieve similar results.