


Efficiently Encrypt Millions of S3 Objects: A Step-by-Step Guide Using AWS S3 Batch Operations and CMK

Table of Contents
Introduction
Keeping data secure is crucial in today’s digital landscape. In this blog post, we will explore how to leverage the power of AWS S3 Batch Operations and AWS Customer Master Keys (CMK) to efficiently encrypt millions of objects in your S3 buckets. By following the step-by-step guide provided, you’ll be able to enhance the security of your data and ensure compliance with industry standards. Let’s dive in!
Prerequisites
To get started with the encryption process, there are a few prerequisites you need to have in place. Make sure you have:
- Created a CMK in AWS Key Management Service (KMS).
- Set up an inventory report on the S3 bucket containing the objects that need to be re-encrypted using the CMK.
- Assigned the required CMK to the S3 bucket.
The first and third steps above are quite simple, so lets go through the detailed steps for setting up an inventory report in Amazon S3
Setting up inventory reports on S3 bucket
- Log in to the AWS Management Console and navigate to the Amazon S3 dashboard.
- Select the S3 bucket that contains the objects you want to re-encrypt.
- Click on the “Management” tab located at the top of the S3 bucket dashboard.
- Scroll down to the “Inventory” section and click on “Create inventory configuration” to create a new inventory configuration.
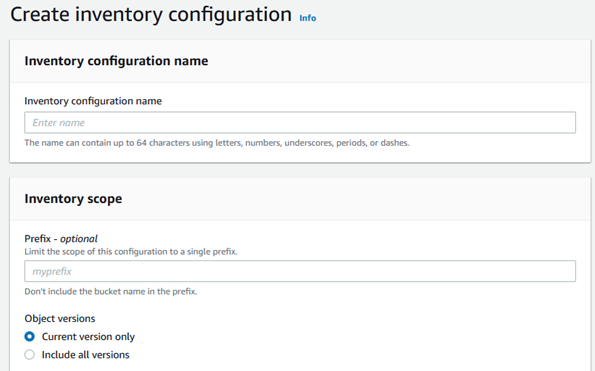
- In the “Create inventory configuration” window, provide the following information:
Report name: Choose a descriptive name for your inventory report configuration.
Prefix: Provide prefix if you want to limit the scope of inventory object.
Included objects: Specify the objects to be included in the inventory report. You can choose to include all objects or use a prefix to filter specific objects.
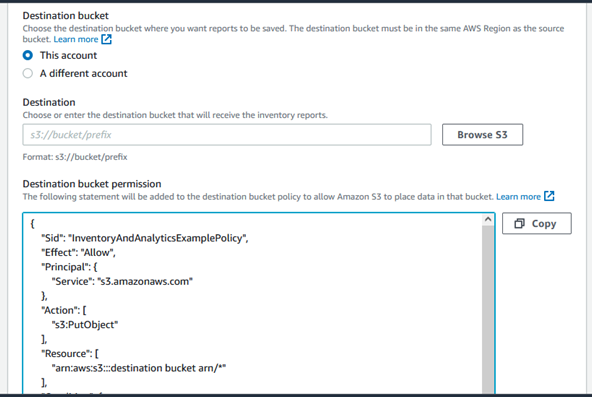
Destination bucket: Select the bucket where you want to store the inventory reports. You can choose an existing bucket or create a new one. It will create a example bucket policy for you, and you can customize as needed.
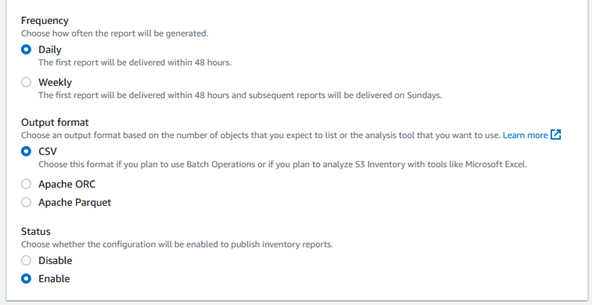
Schedule: Choose the frequency for generating the inventory report. You can select daily, weekly, or monthly.
Format: Select the format for the inventory report. You can choose CSV, ORC (Apache Hive), or Parquet.
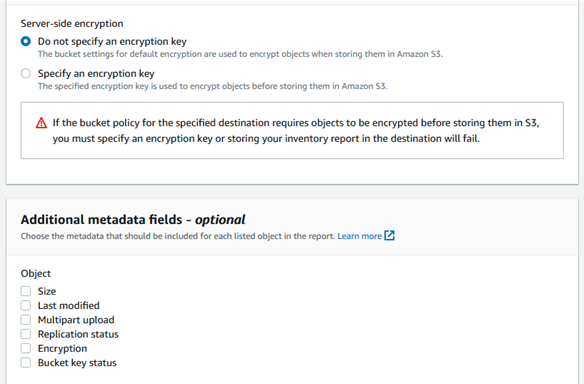
Encryption: Enable encryption for the inventory report if required. You can choose to use server-side encryption with S3-managed keys or provide your own KMS key.
Optional fields: Customize the inventory report by selecting the desired optional fields such as size, storage class, and metadata.
Once you have provided all the necessary information, review the configuration settings. Click on the “Save” button to create the inventory report configuration. Inventory report generation can take up to 48 hours depending on the size of your bucket
Generating the manifest file
Once the inventory report is generated, we can proceed with the encryption process. Follow these steps:
Setting up Glue resources
Create a Glue Database
- Go to the AWS Management Console and navigate to the AWS Glue service.
- Click on “Databases” in the left navigation pane.
- Select “Add database” and provide a name for your database, such as “InventoryDB.”
- Click on “Create” to create the Glue database.
Create an IAM role for the Crawler
- Open the IAM Management Console in a new tab.
- Click on “Roles” in the left navigation pane.
- Select “Create role” and choose the “AWS service” as the trusted entity.
- In the service, search for and select “Glue.”
- Under “Permissions,” select the required policies to grant the necessary permissions to access the S3 bucket where the inventory report is stored. This may include policies such as “AmazonS3ReadOnlyAccess.”
- Provide a name for the IAM role, such as “GlueCrawlerRole,” and click on “Create role.”
Create a Glue Crawler
- Return to the AWS Glue service console.
- Click on “Crawlers” in the left navigation pane.
- Select “Add crawler” to create a new crawler.
- Provide a name for the crawler, such as “InventoryCrawler.”
- Choose the data source as “S3” and specify the S3 bucket where the inventory report is stored.
- Select the IAM role you created earlier (GlueCrawlerRole) for the crawler.
- Configure other settings as needed and click on “Next.”
- In the “Add a database” step, select the Glue database you created (InventoryDB).
- Complete the remaining configuration steps and click on “Finish” to create the crawler.
- “Run crawler” to start the crawling process.
- Wait for the crawler to complete, as it analyzes the inventory report and creates a table in the Glue database based on the schema.
Run Athena queries and save results to S3
- Navigate to the AWS Athena service console.
- Select the Glue database you created (InventoryDB) as the data source.
- Write and execute Athena queries to analyze the data and generate the desired manifest file.
- Once the query result is generated, save it to an S3 bucket of your choice using the workgroup setting.
Below is the sample query to be run on Athena query editor:
select replace(col0, '"', '') as bucket, replace(col1, '"', '') as key
FROM "InventoryDB"."InventoryTable"
If you want to select objects based on timestamp of the object upload/modify, you can use below query to filter out data:
select replace(col0, '"', '') as bucket, replace(col1, '"', '') as key
FROM "InventoryDB"."Inventorytable"
WHERE from_iso8601_timestamp(replace(col3, '"', '')) >= TIMESTAMP '2023-05-25 00:00:00'
  AND from_iso8601_timestamp(replace(col3, '"', '')) < TIMESTAMP '2023-05-28 00:00:00';
Once Athena queries are completed, download the query result and remove the column headers as S3 Batch job does not require headers. You can use shell commands to remove first row from CSV file.
Now we have our manifest file ready, lets create a job!
Create S3 batch job operations using the manifest file
- Navigate to the Amazon S3 service in the AWS Management Console.
- Click on “Batch Operations” in the left-hand menu and select “Create job” to initiate the S3 batch job creation.
- Provide the required information as below:
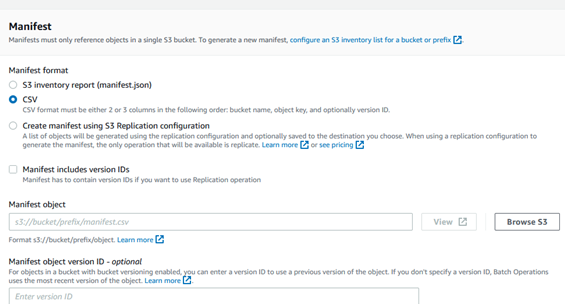
Manifest file type and location: Select your type of manifest file, it could be inventory report or CSV file along with the location where manifests are stored.
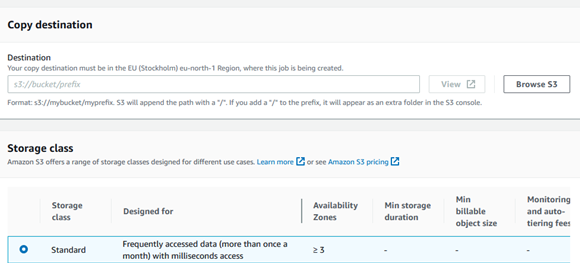
Type of operation and destination bucket and storage class: Provide operation as copy, location where objects will be copied with provided encryption key. It could be same as source bucket or another bucket based on your requirements.
In next steps keep everything to defaults. We have already configured the required KMS key for the bucket. Provide description for your job and priority for the job.
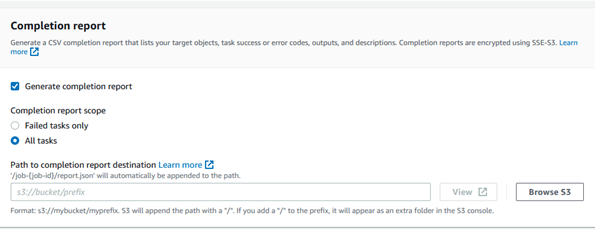
Completion report: You can select the type of report once job is completed. You can select either failed task only or all tasks. We are selecting first one as we don’t want any post job actions on successful ones. Provide path where completion report needs to be saved.
IAM role: Provide an IAM role for this job. It should have an access to perform required operations on all the buckets being considered here. This includes buckets where the inventory report is saved, where object needs to be copied, and where completion report needs to be saved. Finally, review all details and click next.
Once job creation is completed, please run the job and verify its progress on the console.
Conclusion
By following the outlined steps in this blog post, you have successfully encrypted millions of objects in your S3 buckets using AWS S3 Batch Operations and CMK. This process ensures the confidentiality and integrity of your data, providing a robust security layer. Keep exploring the vast capabilities of AWS to enhance the protection of your valuable assets.
About the Author
Deepali Sonune is a DevOps engineer with 10+ years of industry experience. She has been developing high-performance DevOps solutions with stringent security and governance requirements in AWS for 7+ years. She also works with developers and IT to oversee code releases, combining an understanding of both engineering and programming.